| chapter03,4 복습 순서 |
메모 | |
| ch08> HomeAppliances RemoteControllor SoundEffect Refrigerator Television ToyRobot MainTest ch09> Calc Calculator CompleteCalc MainTest1 |
Ex01> Marine Zealot Zergling Unit MainTest1 chapter04 ch01> Define MyFrame FlowLayoutEx |
|
HomeAppliances 클래스 설계
package ch08;

public class HomeAppliances {

	int width;
	int height;
	String color;

}
interface란
| package ch08; public interface RemoteController { //default는 같은 패키지 안에서만 사용 가능 // interface란 구현된 것이 아무것도 없는 밑그림만 있는 기본 설계도 // 멤버변수, 일반 메서드를 가질 수 없고, 오직 추상 메서드와 상수만을 // 멤버로 가질 수 있다. // 추상 클래스보다 추상화가 더 높다. // 인터페이스는 표준, 약속, 규칙입니다. // 사용방법 // class 대신 interface라는 키워드를 사용한다. // class와 같이 public 이나 default를 사용할 수 있다. // 제약 사항 //모든 멤버 변수는 public static final 이어야 한다. public static final int SERIAL_NUMBER = 1000; //상수 //모든 메서드는 추상 클래스이어야 하고, public abstract 키워드를 //생략할 수도 있다. public abstract void turnOn(); void turnOff(); // 컴파일 과정에서 키워드를 알아서 붙여줌 } |
SoundEffect 클래스 설계
package ch08;

public interface SoundEffect {

	public void notification();
}
Refrigerator 클래스 설계 : 인터페이스 구현하기
package ch08;
//인터페이스를 구현하는 방법
public class Refrigerator extends HomeAppliances
					   implements RemoteController, SoundEffect{

	@Override
	public void turnOn() {
		System.out.println("냉장고를 켭니다.");
	}

	@Override
	public void turnOff() {
		System.out.println("냉장고를 끕니다.");
	}

	@Override
	public void notification() {
		System.out.println("띠리리링 ~!");
	}

}
Television 클래스 설계
package ch08;

public class Television extends HomeAppliances
                     implements RemoteController{

	@Override
	public void turnOn() {
		System.out.println("tv를 켭니다.");
	}

	@Override
	public void turnOff() {
		System.out.println("tv를 끕니다.");
	}
}
ToyRobot 클래스 설계
package ch08;

public class ToyRobot implements RemoteController, SoundEffect{

	String name;

	public ToyRobot() {
		this.name = "건담로봇";
	}

	@Override
	public void turnOn() {
		System.out.println("장난감 로봇을 켭니다.");
	}

	@Override
	public void turnOff() {
		System.out.println("장난감 로봇을 끕니다.");
	}

	@Override
	public void notification() {
		System.out.println("두두루 쾅!");
	}

}
인터페이스 연습1 : 다형성, 확장 for문(forecah), turnOn(), instanceof 연산자, 다운캐스팅

package ch08;

import java.util.Iterator;

public class MainTest {
	// main function
	public static void main(String[] args) {

		Television televison = new Television();
		Refrigerator refrigerator = new Refrigerator();
		ToyRobot toyrobot = new ToyRobot();

//		televison.turnOn();
//		televison.turnOff();
//
//		System.out.println("==========================");
//
//		refrigerator.turnOn();
//		refrigerator.turnOff();

		// 다형성 - 배 (신체, 선박, 과일)

		RemoteController[] remote = new RemoteController[3];
		remote[0] = televison;
		remote[1] = refrigerator;
		remote[2] = toyrobot;

		// 확장 for문 turnOn 호출
		for (RemoteController remoteController : remote) {
			remoteController.turnOn();
		}
		System.out.println("-------------------");
		for (RemoteController remoteController : remote) {
			remoteController.turnOff();
		}
		System.out.println("-------------------");
		// instanceOf 연산자 사용해보기
		for (int i = 0; i < remote.length; i++) {
			if (remote[i] instanceof ToyRobot) {
				System.out.println("장난감 객체입니다.");

				// 도전과제
				// remote[i] 으로 접근해서
				// 화면에 name 멤버 변수를 출력해주세요.
//				double a = 1.0;
//				int b = (int)a;
				String name = ((ToyRobot) remote[i]).name;// 다운캐스팅
				System.out.println(name);

			}
			// if Tv~
			if (remote[i] instanceof Television) {
				System.out.println("텔레비전 객체입니다.");
			}
			// if Rfr~
			if (remote[i] instanceof Refrigerator) {
				System.out.println("냉장고 객체입니다.");
			}
		}


	}// end of main

}// end of class| //인터페이스의 장점 //표준화 가능 하다. //서로 관계없는 클래스들에게 관계를 맺어 줄 수 있다. //클래스 간에 결합도를 낮춰서 유연한 코드를 설계할 수 있다. //정리 //객체 지향 패러다임의 핵심 //객체와 객체간에 상호 협력해서 코드를 설계해 나간다(버스, 질럿) //객체와 객체간에 관계를 정의하여 코드를 설계해 나간다. //(상속, 포함관계, 추상클래스, 인터페이스) //다형성(클래스를 다양한 형태로)!! |
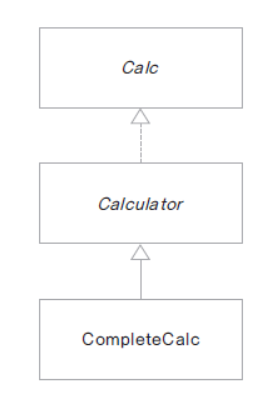
인터페이스 연습2 : 계산
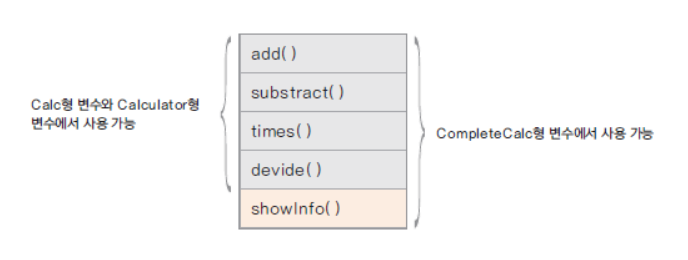
Calc
package ch09;

public interface Calc {

	double PI = 3.14;
	int ERROR = -99999;

	//추상메서드
	//return type을 int
	//add, 매개변수 num1, num2 +
	//substract, 매개변수 num1 , num2 -
	//times 매개변수 num1, num2 *
	//divide 매개변수 num1, num2 /
	//void showInfo()

	int add(int num1, int num2);
	int substract(int num1, int num2);
	int times(int num1, int num2);
	int divide(int num1, int num2);
	void showInfo();

}
Calculator
package ch09;

public abstract class Calculator implements Calc{
                                       //구현했다
	@Override
	public int add(int num1, int num2) {
		return num1 + num2;
	}

	@Override
	public int substract(int num1, int num2) {
		return num1 - num2;
	}

}
CompleteCalc
package ch09;

public class CompleteCalc extends Calculator{

	@Override
	public int times(int num1, int num2) {
		return num1*num2;
	}

	@Override
	public int divide(int num1, int num2) {
		int result = 0;
		if(num2 == 0 ) {
			System.out.println("0으로 나눌 수 없습니다.");
			result =  ERROR;
		}else {
			result = num1/num2;
		}
		return result;
	}

	public void showInfo() {
		System.out.println("모두 구현했습니다.");
	}

}
결과

package ch09;

public class MainTest1 {

	public static void main(String[] args) {

		//부모타입  Calc
		Calc calc = new CompleteCalc();

		int num1 = 10;
		int num2 = 2;

		System.out.println(calc.add(num1, num2));
		System.out.println(calc.substract(num1, num2));
		System.out.println(calc.times(num1, num2));
		System.out.println(calc.divide(num1, 0));

		// 오류를 해결해 봅시다.
//		calc.showInfo();

	}

}
복습
Marine
package Ex01;

public class Marine extends Unit {

	public Marine(String name) {
		this.name = name;
		this.power = 5;
		this.hp = 100;
	}

}// end of class
Zealot Zergling

Unit
package Ex01;

public class Marine extends Unit {

	public Marine(String name) {
		this.name = name;
		this.power = 5;
		this.hp = 100;
	}

}// end of class
결과

package Ex01;

import java.util.Scanner;

public class MainTest1 {
	//main function
	public static void main(String[] args) {

		Zealot zealot1 = new Zealot("질럿1");
		Marine marine1 = new Marine("마린1");
		Zergling zergling1 = new Zergling("저글링1");


		zealot1.showInfo();
		marine1.showInfo();
		zergling1.showInfo();

		zealot1.attack(zergling1);
		zealot1.attack(marine1);

		marine1.showInfo();
		zergling1.showInfo();

		//스캐너를 사용해서 실행에 흐름을 만들어 보세요
		//1. 누르면 질럿이 마린을 공격한다.
		//2. 마린이 저글링을 공격한다.
		//3. 저글링이 질럿을 공격한다.

		final int ONE = 1;
		final int TWO = 2;

		Scanner sc = new Scanner(System.in);
		int button = sc.nextInt();

		Unit unit;

		if(button == ONE) {
			zealot1.attack(marine1);
		}else {
			zergling1.attack(zealot1);
		}
//		unit.showInfo();

		//다른 사람이 한 것
//		Scanner sc = new Scanner(System.in);
//		boolean gameOver = false;
//		int userInput = 0;

//		final int ZEALOT_ACTION1 = 1;
//		final int ZEALOT_ACTION2 = 2;
//		final int ZEALOT_ACTION3 = 3;
//		final int ZEALOT_ACTION4 = 4;
//		final int GAME_END = 5;

//		while(!(gameOver)) {
//			System.out.println("1. 질럿이 마린을 공격");
//			System.out.println("2. 마린이 저글링을 공격");
//			System.out.println("3. 저글링이 질럿을 공격");
//			System.out.println("4. 유닛 상태 보기");
//			System.out.println("5. 종료");
//			System.out.print("입력 : ");

//			userInput = sc.nextInt();

//			if(userInput == ZEALOT_ACTION1) {
//				zealot1.attack(marine1);
//			}
//			else if(userInput ==2) {
//				marine1.attack(zergling1);
//			}
//			else if(userInput ==3) {
//				zergling1.attack(zealot1);
//			}
//			else if(userInput==4){
//				zealot1.showInfo();
//				marine1.showInfo();
//				zergling1.showInfo();
//			}
//			else if(userInput ==5) {
//				System.out.println("게임을 종료합니다.");
//				gameOver = true;
//			}
//			else {
//				System.out.println("잘못입력하셨습니다. 다시입력하세요.");
//			}
//		}//end of while

	}//end of main

}//end of class
Static

package Ex01;

public class Define {

		public static final int MIN = 1;
		public static final int MAX = 9999;
		public static final double PI = 3.14;
		public static final String GREETING = "Good morning";
		public static final int MATH_CODE = 1001;
		//메인함수
		public static void main(String[] args) {

//			Define define = new Define();
			//new 라는 키워드 없이 클래스 이름으로 사용할 수 있다.
			System.out.println(Define.MIN);
			System.out.println(Define.MAX);
			System.out.println(Define.PI);
			System.out.println(Define.GREETING);
			System.out.println(Define.MATH_CODE);


		}//end of main
}//end of class
첫번째 GUI 프로그램 작성

package ch01;

import javax.swing.JFrame;

public class MyFrame extends JFrame{

	public MyFrame() {
		setTitle("첫번째 GUI 프로그램 작성");
		setSize(400,400);
		setDefaultCloseOperation(JFrame.EXIT_ON_CLOSE);
		setVisible(true);         //클래스 이름으로 들어가니 얘는 static , 상수
	}                             //콘솔에 빨간 부분 화면창 끔과 동시에 꺼짐

	public static void main(String[] args) {
		new MyFrame();
	}
}
FlowLayout

package ch01;

import java.awt.FlowLayout;
import java.util.ArrayList;

import javax.swing.JButton;
import javax.swing.JFrame;

class MyFrame2 extends JFrame{

	//배열을 사용해서 변경해주세요
//	private JButton[] buttons = new JButton[6];

	//ArrayList로 변경해주세요
	//문제해결 능력  C R U D
	//분할 앤 정복방식 <---
	//1. 생성방법
	ArrayList<JButton> buttons = new ArrayList<JButton>();
	//2. 값을 추가하는 방법
 	//3. 값을 출력하는 방법

//	private JButton button1;
//	private JButton button2;
//	private JButton button3;
//	private JButton button4;
//	private JButton button5;
//	private JButton button6;

	final int JBUTTONS_SIZE = 16;

	public MyFrame2() {
		initData();
		setInitLayout();
	}

	private void initData() {

		setTitle("Flow Layout 연습");
		setDefaultCloseOperation(JFrame.EXIT_ON_CLOSE);
		setSize(500,500);
		setLayout(new FlowLayout(FlowLayout.LEFT,1,10));//배치관리자

		//기본 배열
//		buttons[0] = new JButton("1번째 버튼");
//		buttons[1] = new JButton("2번째 버튼");
//		buttons[2] = new JButton("3번째 버튼");
//		buttons[3] = new JButton("4번째 버튼");
//		buttons[4] = new JButton("5번째 버튼");
//		buttons[5] = new JButton("6번째 버튼");

		//ArrayList를 사용하는 방법
//		buttons.add(new JButton("1번째 버튼"));
//		buttons.add(new JButton("2번째 버튼"));
//		buttons.add(new JButton("3번째 버튼"));
//		buttons.add(new JButton("4번째 버튼"));
//		buttons.add(new JButton("5번째 버튼"));
//		buttons.add(new JButton("6번째 버튼"));

		//for문 변경
		//ArrayList는 처음 사이즈가 0입니다.
		for (int i = 0; i < JBUTTONS_SIZE; i++) {
			System.out.println("i" + i);
			buttons.add( new JButton((i+1)+"번째 버튼"));
		}

		//for문 변경
//		for (int i = 0; i < buttons.length; i++) {
//			buttons[i] = new JButton("버튼" + (i+1));
//		}

//		button2 = new JButton("2번째 버튼");
//		button3 = new JButton("3번째 버튼");
//		button4 = new JButton("4번째 버튼");
//		button5 = new JButton("5번째 버튼");
//		button6 = new JButton("6번째 버튼");
	}//end of initData

	private void setInitLayout() {
		setVisible(true);
		//기본배열
//		add(buttons[0]);
//		add(buttons[1]);
//		add(buttons[2]);
//		add(buttons[3]);
//		add(buttons[4]);
//		add(buttons[5]);

		//for문 변경
//		for (int i = 0; i < buttons.length; i++) {
//			add(buttons[i]);
//		}
//		add(button1);
//		add(button2);
//		add(button3);
//		add(button4);
//		add(button5);
//		add(button6);

		//for문 변경
		for (int i = 0; i < buttons.size(); i++) {
			add(buttons.get(i));
		}
//		add(buttons.get(0));
//		add(buttons.get(1));
//		add(buttons.get(2));
//		add(buttons.get(3));
//		add(buttons.get(4));
//		add(buttons.get(5));

	}//end of setInitLayout
}//end of MyFrame2

public class FlowLayoutEx {

	public static void main(String[] args) {

		new MyFrame2();
	}
}
인터페이스란?
- 모든 메서드가 추상 메서드로 선언됨 public abstract
- 모든 변수는 상수로 선언됨 public static final
interface 인터페이스 이름{
	public static final float pi = 3.14F;
	public void makeSomething();
}- 자바 8부터 디폴트 메서드(default method)와 정적 메서드(static method)기능의 제공으로 일부 구현 코드가 있음
인터페이스 정의와 구현
java project chapter03>pakage ch09
인터페이스 구현과 형 변환
- 인터페이스를 구현한 클래스는 인터페이스 형으로 선언한 변수로 형 변환 할 수 있음
- Calc calc = new CompleteCalc();
- 상속에서 형 변환과 동일한 의미
- 클래스 상속과 달리 구현 코드가 없으므로 여러 인터페이스를 구현할 수있음(cf. extends)
- 형 변환되는 경우 인터페이스를 선언된 메서드만을 사용가능함
인터페이스가 하는 일
- 클래스나 프로그램이 제공하는 기능을 명시적으로 선언
- 일종의 클라이언트 코드와의 약속이며 클래스나 프로그램이 제공하는 명세(specification)
- 클라이언트 프로그램은 인터페이스에 선언된 메서드 명세만 보고 이를 구현한 클래스를 사용할 수 있음
- 어떤 객체가 하나의 인터페이스 타입이라는 것은 그 인터페이스가 제공하는 모든 메서드를 구현했다는 의미
- 인터페이스를 구현한 다양한 객체를 사용함 - 다형성
인터페이스를 활용한 dao 구현하기
- DB에 회원 정보를 넣는 dao(data access object)를 여러 DB제품이 지원될 수 있게 구현함
- 환경파일(db.properties)에서 database의 종류에 대한 정보를 읽고 그 정보에 맞게 dao 인스턴스를 생성하여 실행 될 수 있게 함


'코리아 IT아카데미 > Java' 카테고리의 다른 글
| 11일차 | Object 클래스 : String활용, toString(),equal(),Layout (0) | 2021.11.01 |
|---|---|
| ddazua_Java | 4강 연산자2 (0) | 2021.11.01 |
| 9일차| 다형성, 업캐스팅, 배열다형성, 다운캐스팅, 추상메서드, 템플릿 메서드 패턴 (0) | 2021.10.28 |
| 8일차 | 배열, 배열리스트, 상속, 오버라이드, 상속할수없는클래스 (0) | 2021.10.27 |
| 7일차 | Marine·Zealot·Zergling설계, 랜덤·캘린더 유틸 사용, 싱글톤 패턴 만들기 (0) | 2021.10.26 |


